By Pete | My Husband’s Nook
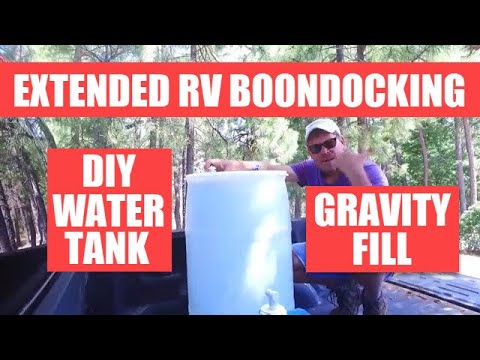
Generally you simply wish to be boondocking longer than your RV contemporary water tanks do and that causes points with cleanliness and tenting security. Our resolution was to construct a DIY transportable water tank for RV boondocking utilizing a gravity fill tenting water container.
We love RV ideas and hacks that can allow you to carry on tenting! Watch our VIDEO to see how straightforward it’s to construct and use!
VIDEO
Observe: This video is suitable with Chrome, Firefox and Safari browsers with out advert blockers enabled. If you’re having bother viewing this video, please disable any advert blockers and change to a suitable browser. Thanks!
Hit the “STAY” button within the backside proper nook to watch your complete video. If you wish to re-watch it once more, simply refresh your browser.
Psst we’re compensated…see our disclosures.
Water Containers For Shorter RV Journeys
Generally the greatest tenting gear is the sort you construct your self!
Refilling Water On Shorter Journeys
We now have a complete put up devoted to find out how to refill contemporary water tanks throughout tenting journeys the place we present you 4 completely different strategies so verify them out to see which one is greatest for you. (We truly use all of them, it simply will depend on our specific tenting scenario.)
Our 7 gallon jugs
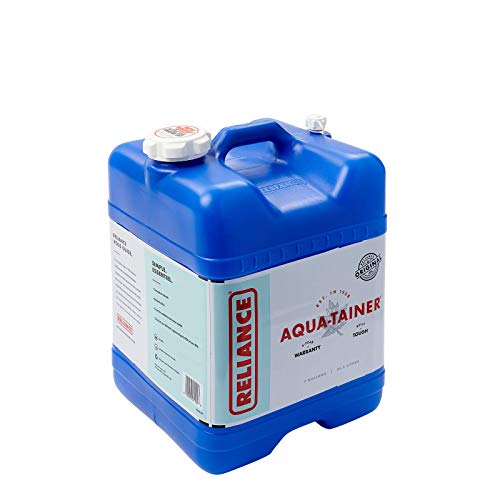

We use 7 gallon tote jugs to refill our RV contemporary water tank on shorter journeys.
Choices For Longer Journeys
However, after we are boondocking for longer intervals of time, our journey trailer’s everlasting water tanks and our smaller tenting water containers don’t have sufficient water storage capability to fulfill our wants. That’s after we fill our 35 gallon transportable water tank which can give us an additional week or extra of dry tenting relying on how conservatively we use water.
No Electrical energy Requirement
Electrical energy is one other merchandise briefly provide when boondocking, so we didn’t wish to use energy for an electrical pump to switch water from our transportable water tank to our put in RV contemporary water holding tanks, so we designed our system to work with an RV ingesting water hose and utilizing solely a gravity fill switch.
How To Construct
You’ll discover the printable directions as you scroll down the web page.
Step 1. Get the provides
Get these 4 following provides right here:
- Plastic Beverage Drum
- Spigot Valve
- Hose Adapter
- Blow Out Plug

I need “5 Secrets and techniques To Profitable Tenting Journeys” plus weekly tenting ideas & recipes.
Merchandise #1: Plastic Beverage Drum
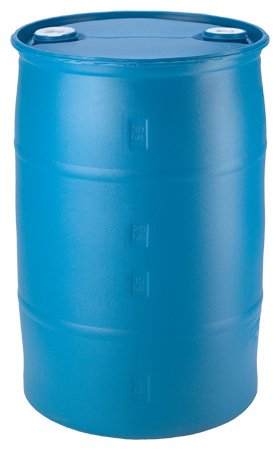
We obtained our 35 gallon tender drink container from an area soda beverage distributor however you could find them from personal sellers in addition to on Amazon. The container comes with pre-drilled holes and caps which have the flexibility to just accept accent fittings.
- We selected a 35 gallon container measurement as a result of it was extra manageable however a 55 gallon drum provides you extra capability and works the identical means.
Merchandise #2: Spigot Valve
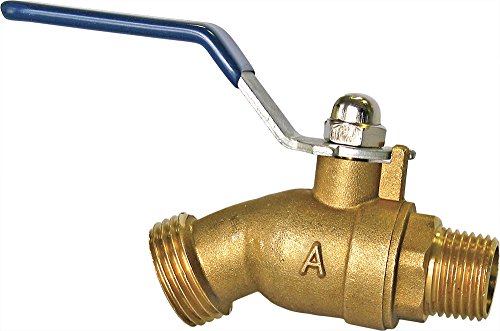
Ensure you get a spigot valve with correct sized fittings. The most typical measurement of becoming is 3/4 inch however confirm which measurement is required in your particular plastic drum.
Merchandise #3. Hose Adapter

As with the opposite objects on this checklist, be sure to get a hose adapter with correct sized fittings. The most typical measurement of becoming is 3/4 inch however confirm which measurement is required in your particular setup.
Merchandise #4. Blow Out Plug

You want a blow out plug but it surely gained’t truly be used for its designed function, you can be utilizing it as a filler vent cap.
Step 2. Collect instruments
Collect device wanted: Screwdriver
Step 3. Punch out each barrel caps
Utilizing the screwdriver, punch out the middle portion of the three/4-inch threaded a part of each barrel caps. (That is the place your spigot valve and hose adapter will thread into.)
Step 4. Connect valve, adapter and plug/vent cap to drum
- Thread the spigot valve into the threaded barrel cap that’s closest to the container rim.
- Screw the hose adapter into the threaded barrel cap that’s furthest from the container rim.
- Screw the blow out plug/filler vent cap into the hose adapter. (Observe: This turns into the filler port for utilizing a ingesting water hose to fill the transportable water tank. IMPORTANT: If you happen to use this technique for filling, be sure to open the spigot valve to offer correct venting to keep away from rupturing the tank.)

How To Fill With Water
Use a ingesting water hose to fill your transportable tenting water container by considered one of two strategies:
- Take away the blow out plug cap/filler vent cap from the hose adapter, then thread the hose to it and fill the container. IMPORTANT: If you happen to use this technique for filling, be sure to open the spigot valve to offer correct venting to keep away from rupturing the tank.
- Utterly take away both cap and easily fill the container by the opening.
How To Switch From Transportable To RV Recent Water Tank
- Make sure the transportable RV tenting water container is greater than the RV contemporary water filler port, in any other case the gravity fill gained’t work.
- Lay the transportable RV tenting water container on its aspect with the spigot valve dealing with down.
- Thread the ingesting water hose to the spigot valve.
- Place the opposite finish of the ingesting water hose within the RV contemporary water filler port opening.
- Open the spigot valve and loosen the cap on the vent/filler port as essential to vent the tank because it gravity feeds into your RV contemporary water tank.
- The RV contemporary water tank will overflow when it’s full. At the moment, shut the spigot valve, take away the hose from the RV contemporary water filler port opening and the transportable RV tenting water container, then, substitute the cap on the journey trailer’s contemporary water filler port.
Printable Directions
DIY Transportable Water Tank For Gravity Filling Onboard RV Recent Water Tank
This transportable water container is used to switch water into an RV’s contemporary water tank by a gravity feed technique.
Yield: 1 Container
Value: 125.00
-
1 Screwdriver
-
1 RV contemporary water hose
Construct the tank
-
Collect tools and supplies. Be certain that the becoming sizes are suitable with one another and your water hose.
-
Utilizing the screwdriver, punch out the middle portion of the three/4-inch threaded a part of each barrel caps. (That is the place your spigot valve and hose adapter will thread into.)
-
Thread the spigot valve into the threaded barrel cap that’s closest to the container rim.
-
Screw the hose adapter into the threaded barrel cap that’s furthest from the container rim.
-
Screw the blow out plug/filler vent cap into the hose adapter. (Observe: This turns into the filler port for utilizing a ingesting water hose to fill the transportable water tank. IMPORTANT: If you happen to use this technique for filling, be sure to open the spigot valve to offer correct venting to keep away from rupturing the tank.)
Fill tank with water
-
Use a ingesting water hose to fill your transportable tenting water container by considered one of two strategies:
-
Technique #1: Take away the blow out plug cap/filler vent cap from the hose adapter, then thread the hose to it and fill the container. IMPORTANT: If you happen to use this technique for filling, be sure to open the spigot valve to offer correct venting to keep away from rupturing the tank.
-
Technique #2: Utterly take away both cap and easily fill the container by the opening.
Switch From Transportable To RV Recent Water Tank
-
Make sure the transportable RV tenting water container is greater than the RV contemporary water filler port, in any other case the gravity fill gained’t work.
-
Lay the transportable RV tenting water container on its aspect with the spigot valve dealing with down.
-
Thread the ingesting water hose to the spigot valve.
-
Place the opposite finish of the ingesting water hose within the RV contemporary water filler port opening.
-
Open the spigot valve and loosen the cap on the vent/filler port as essential to vent the tank because it gravity feeds into your RV contemporary water tank.
-
The RV contemporary water tank will overflow when it’s full. At the moment, shut the spigot valve, take away the hose from the RV contemporary water filler port opening and the transportable RV tenting water container, then, substitute the cap on the journey trailer’s contemporary water filler port.
Inflatable Bladders
If you happen to don’t have room to hold a giant barrel or plenty of jugs, it’s possible you’ll wish to think about a water bladder than might be folded and simply packed for storage and transportation. Watch our YouTube video: Ditch the Water Woes – We Discovered a DAILY SHOWER Resolution for BOONDOCKING!
The place To Get Water When Boondocking
As we talked about within the video, we fill our 35 gallon transportable tenting water container at residence and transport it to our boondocking website. However, if we’re tenting for an particularly lengthy prolonged time period, we depart our journey trailer set in place and drive to an RV park, campground or fuel station that gives providers for dumping of waste and refilling of ingesting water. Then, we head again to our distant campsite with an empty transportable waste tank and stuffed transportable water containers.
In the case of boondocking, the grey water and black water tanks trigger different points. We use RV transportable waste holding tank equipment which we’ll focus on intimately in one other put up.
As we talked about within the video, right here is the hyperlink to our Transportable Photo voltaic Panels For RV Tenting VIDEO and weblog put up. We use our transportable tenting water container after we are boondocking (which is about 99% of the time for us LOL).
Be taught extra about it in our Boondocking: How And The place To Go Dispersed Tenting put up.